Brooder Box Construction
Feb. 22-26, 2016
We took most of our lessons off this week to focus on our upcoming chicks! They should be hatching around Monday, Feb. 29th!!!! Here are a few pictures:
 |
| This was the form I wrote up to make sure we didn't have our eggs up on the "X" two nights in a row. By following my chart, we were sure to have them alternating each night; regardless of the day's rotation. We only had to turn the eggs three times per day, but we rotated them more than that. When we got closer to the 18th day, we started slowed down how much we touched them. |
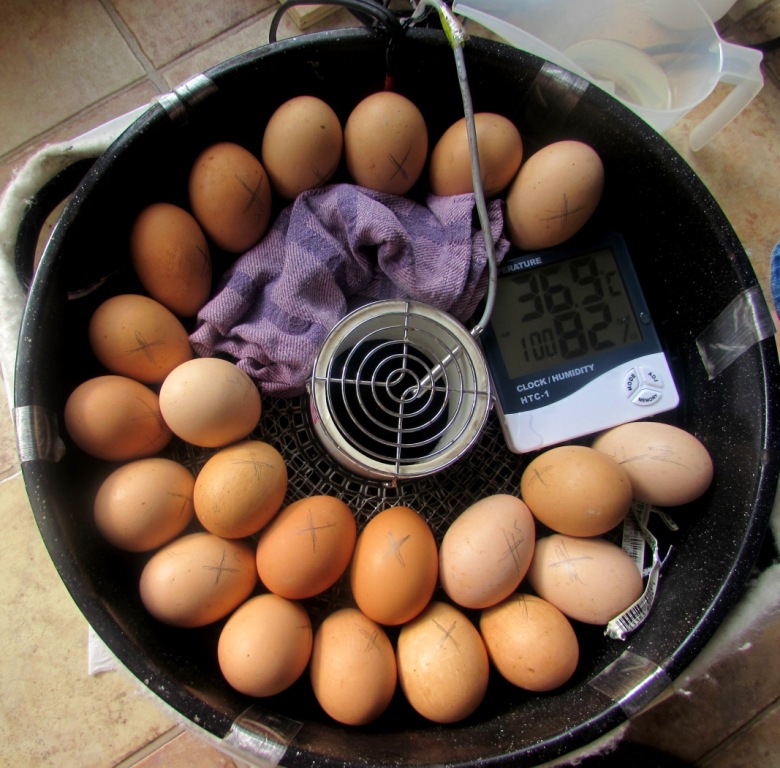 |
| At their 18th day, we have to put them all alike, but more vertical, rather than laying down flat, with the bigger/rounded end on the top, and the pointy end down. Their egg sack should be in the rounded part, and having that on the top should help their hatching. You can see the humidity monitor; where we make sure we focus on keeping it higher these last days. |
 |
| We were keeping the incubator's humidity at around 60%, starting the 18th day the humidity has to be around 80%. I brought in our humidifier to help keep the whole room more humid. |
Dd made the brooder house this week. You have to design the brooder box with rounded corners so the chicks can't pile up on each other, and possibly crushing a chick.

 |
| We haven't put in the newspapers yet. Dd put in a temperature reading prob and then kept working until she had the heat light placed exactly high enough to get a 95 degree reading on the floor. She put the heating lamp to one side, so if the chicks are hot they can go over to the cool side to cool down, or get right under the lamp to warm up. |
 |
| Now all we need are the chicks! We bought the feed, the watering thing, and pine shavings for the bottom cover. First we are to use something not slippery for the floor cover the first few days; just not newspaper since that is slick and slippery. I have some "painting shirts" and lots of those red rags you buy for home projects--I'll have to get those out and ready. I was also thinking I might put up a door and cardboard to block the air drafts that could come in the sun-room from our front door. The books all say to have the room be draft-free. Also, perhaps Dd could build us a second brooder home to put out in the garage (or outbuilding), so we can move our chicks out there after their first few delicate days in the sun-room. I keep reading how we shouldn't have the birds in our house due to 'chick dust' that is very unhealthy for people to inhale. But, I do want them inside the first few days where we can keep a constant eye on them. My main post about our chicken adventure: |
.........
Grinning! Loving the input going into this 'science' time ... and your Dd has made an excellent brooder. What will you do with Agnes?
ReplyDeleteThis is our "sun room" and it is where we kept our Christmas tree since it can be closed off by two doors. We will have a lid for the brooder box too. But, we have a lot more reason to make sure the two doors stay closed when our chicks will be inside, and we know that a kitty would definitely kill chicks if given the opportunity--no doubt about that. I'll feel better when we can get the chicks out of the house, and in a safer location, but I really want to keep an eye on them their first days. Chelle, so good to see you here! I've been missing you, and praying for you each day!
DeleteWow you guys are amazing! This is serious business hatching chicks!!! It's like getting a bunch of children to take care of! That's an impressive brooding house!!! Can't wait to see more chick pictures when more hatch!!!!
ReplyDelete