Saturday, March 12, 2016

Apologia General Science Experiment 6.2

Apologia General Science Experiment 6.2
Separation of Sedimentation


I just wanted to show a bit of the Student Notebook that we use along with our textbook.  It really does help us process what we are learning and evaluate what we are seeing/learning.


We bought the kit that contains all (or most) of the things we need to do our experiments, and it is really wonderful!  We only had to dig up some soil and some gravel/rocks.

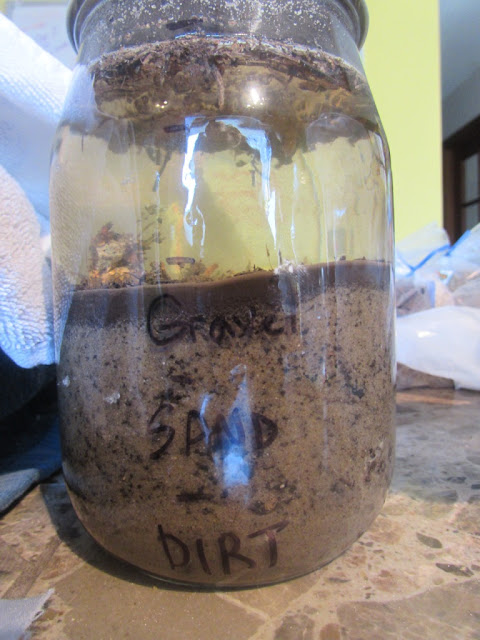
We had to add into a jar 1/5 of dirt, 1/5 of rocks, 1/5 of gravel, and then fill up the rest of the jar with water (specifically fill it up with water until the jar is 3/4 full).  So, I took a ruler and marked off sections every inch and then filled up each thing to the mark I made with a Sharpie.


Dirt/Soil


Dd adding in the sand


Adding in the gravel


Mixing up the ingredients


Dd wanted to stir it up after shaking it up

Add water and shake some more!

Lastly put it down to settle

After we mixed it up, we had to wait one hour and then go look at how much settling has occured.


Now we wait 24 hours and then check the jar again...and perhaps see more clear layers?!


Update: Two Days Later!

Update: Another Five Days Later!
(last update)


This was a very easy, and fun experiment.  
.............

Chicks Day Twelve

Chicks Day Twelve
When holding the chicks, they feel so different now.  The soft downey feathers are getting replaced by ones that feel a little like hay.  When Dd got in the booster box with them today they repeatedly hopped up on her legs!!!  She loved it!  I'm so glad they are comfortable with us.


It appears that they are liking jumping up on the water container!  How funny!


They are still all doing very well! And changing so much each day.
......

Apologia General Science Experiment 6.1

Apologia General Science Experiment 6.1

Alum in hot water, in a cup with a washer knotted onto a thread.  I think we were suppose to grow a crystal, but this experiment flopped.  We still have it on our counter--after six days, and I can see some crystals forming around the edge.  I'll take a new picture of what it looks like after sitting for a week, so you can see.  

We needed two tablespoons of Alum, two glasses, a plate, thread, two washers, and hot water.

We were only suppose to fill up this juice glass half-way, but we put in too much water, and it was too late to do anything about it.  We were to stir in the Alum, and stir until it dissolved, and it was *suppose* to have some Alum that wasn't going to dissolve, but ALL our Alum did dissolve.  After letting the stirred hot water settle, we were to carefully pour the top *clear* water into a new glass that has a washer at the bottom, attached to a string of thread, that is about eight inches long and goes out of the glass and out to the counter-top and has another washer holding it down.

Stirring the Alum in hot water in round glass.

This picture shows you the set up, after the Alum was dissolved into the round cup, and then we poured the alum-water from the round cup into the cup with the waiting washer.  

Immediately bubbles started coming up.


We had extra water left over so we decided to do the experiment twice and see how each glass does.  I'll post updated pictures soon, but I think nothing really happened except a *tiny* little crystal on one little spot on the thread and some crystallization on the glass where the water met the air inside.

Follow-Up Pictures after Six Days:


These two washers were identical when we started.  The pictures don't do a very good job of showing just how 'eaten' the washer on the right became.

Each thread had a chunk of crystal on it.

You can see the crystallization on the washer and the thread.


The Alum must have really been a weak acid b/c the washers really took a whale of a beating!  The smaller washer really is so much more frail compared to the outside washer.  You can see the metal flakes all in the water solution.


.............

Chicks Days Eight Thru Eleven March 2016

Chicks Days Eight Thru Eleven 
March 2016

Hello Friends!  another week of growing, eating, and pooping!  I've been feeding them lots of greens, and started putting Kombucha (kind of fermented tea) in their water.  They all seem to be doing really well...thankfully!

A lot of changes to their wings and legs.


They have really all come together and don't separate anymore.

Close-up of tail feathers.


I've tried repeatedly to capture a picture of when the chicks stretch out one wing, and at the same time they stretch out the corresponding leg---it is always this big, big stretch!  This is the closest I've got to show you.

The Buff Orpington's feathers are behind the Black Star's development.  The Buff's seem like they must be a day or two younger than the Black Star's.  

You can see how long the wing and tail feathers are getting.  The birds are running across the length of the box flapping their wings and taking little flights.  The little feeding lid has worked well.

This picture shows how the chicks love to nestle down in the towels and make their little nests and peck around themselves and then drift off to naps.  It is really cute to watch.


I still like to hold them on their backs and pet their tummies.  Most of the birds love it when I do it, and close their eyes and start falling asleep.


At day eleven the first chick gets up on the watering tower!  I have no idea how she did that!  


..............